.png)
Programming ATtiny85 with USBASP programmer by using cmd and AVRdude
Programming ATtiny85 with USBASP programmer by using cmd and AVRdude

This short tutorial will be more useful for ones who are new to programming Atmel family microchips, after this tutorial we will get some basic knowledge about using CodeVisionAVR, how to setup a project and we will also cover a little bit of C++ programming.
Before you start going throught this guide, make sure that you have got everything that is in these lists.
Necessary equipment required:
·
USBASP
programmer with a cable
·
Solderless
breadboard
·
Few jumper wire
cables
·
200ohms
resistor
·
1 Led
Programms required:
·
Some kind of
programming environment where to create the code and where to compile it, for
this tutorial I have chosen CodeVisionAVR.
·
AVRDUDE

Schematic view of the circuit:

Short guide on CodeVisionAVR:
I won't be discussing principles how the CodeVisionAVR
works, but instead I will jump straight into creating the project solution.
The first thing to do is of course to start the program
and create a new project (“File -> New -> Project”), a message box will
pop up:

Nothing strange, we want to use it so click on “Yes” and
let's continue, another window will pop up, giving us some of the options
(Target AVR Chip Type):
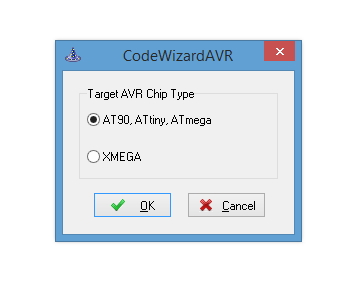
We need to select the first radio button, which has some
text next to it: “AT90, ATtiny, Atmega”, this is what we need for our project,
so click on “OK”.
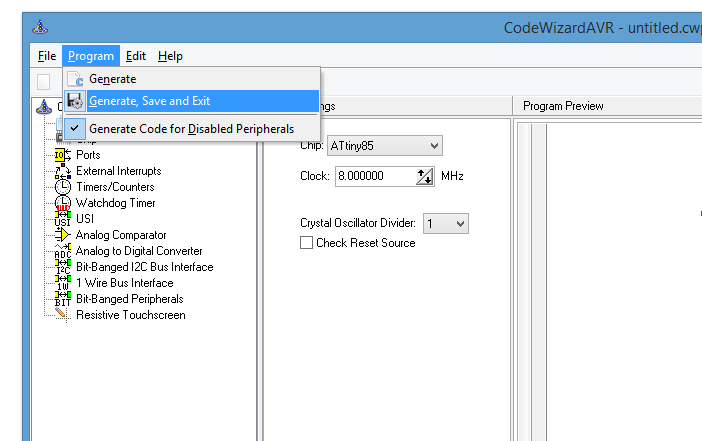
Finally we have reached Chip Settings Window: in the
listbox provided next to the “Chip” label you will need to find the chip you
are going to program (ATtiny85), leave other settings as they are, after that
just choose an option: “Program-> Generate, Save and Exit”.
Few File Dialogs will come up, you will need to choose
where to save them, and give a name to them. The best thing to do would be to
create a folder and save these files in that folder:

After everything has been saved, in the main window of
the left side in the Code Navigator, we have our project root with our files,
on the left and the biggest part we have on the right with our code which was
generated previously, now we need to clean it up, leaving some bits (tiny85
library, initialization and the loop):

Now the code can be written, the complete code is
given below.

After you have either rewritten or copied this code (I would highly
suggest to go through it and try to understand all features involved with this
code), the project is ready to be build. To build the project go to:
“Project->Build All”.

If the build was successful, you shouldn't get any errors:

So click, on “OK”, and start AVRdude to program our ATtiny !
Before we actually start the AVRdude, lets prepare our workspace. The
first thing is to set-up our circuit connected to USBASP programmer:

After the circuit has been set up, lets prepare some data needed for
AVRdude:
Attiny85 in AVRdude is
indentified as a part numer t85
Hex file location should be
in : Project_Folder->Debug->Exe->hex_file_name.hex
So my full file path is:
C:\cvavr\projects\ATtiny85_tutorial_1\Debug\Exe\first_project.hex
Full AVRdude command will
look like this:
avrdude.exe -p t85 -c
usbasp -B 4 -e -U
flash:w:"C:\cvavr\projects\ATtiny85_tutorial_1\Debug\Exe\first_project.hex":i
-v
As the AVRdude command is
ready we need to start our Command Prompt, to start the Command Prompt type in
windows search cmd, and it should find it easily.

Type command: cd \ (by that
we are chaning the directory to C:\)

Type another command: cd
Win (and press Tab button on the keyboard, by that it should return the full
folder name WinAVR-20100110 (if the AVRdude was installed by default, otherwise
you will need to find it's location), type “\” and press again Tab untill you
find “bin”, the full command should look something like this: cd
WinAVR-20100110\bin and at the end press “Enter”.

.
The next thing do is to
copy and paste our command which we prepared before: avrdude.exe -p t85 -c
usbasp -B 4 -e -U
flash:w:"C:\cvavr\projects\ATtiny85_tutorial_1\Debug\Exe\first_project.hex":i
-v
To paste that command line
into cmd, we need to do it by Right click on the cmds area with a mouse:


So as our USBASP programmer
at one end is connected to computer's USB port and at another end to our
microcontroller, we are ready to do programming, so just simply press “Enter”
once more and watch.
A lot of thing will be
listed in the cmd screen, but at the end if everything was done correctly you
should see something like that:
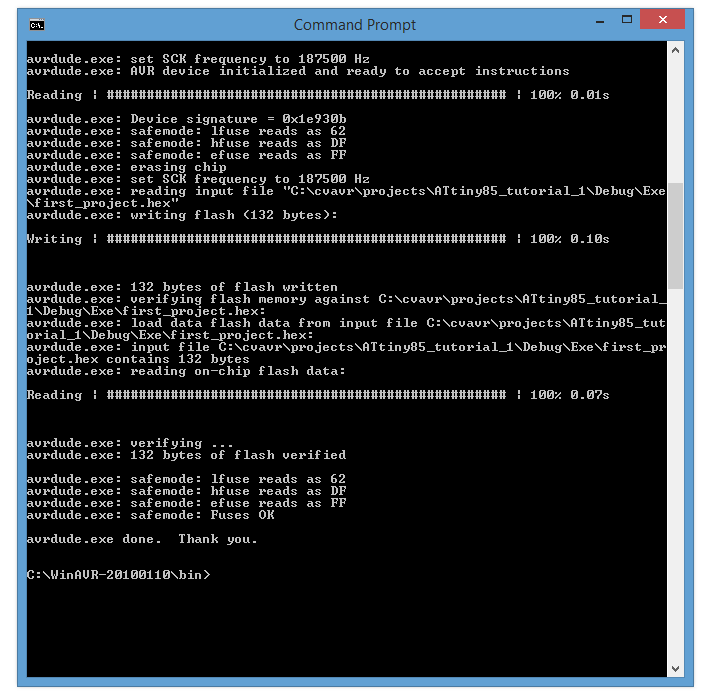
Also as soon as the chip
has been programmed the LED should start blinking you can disconnect all the
wires only leaving the VCC and GND wires to the programmer (do it only when
programmer is disconnected from the USB) or instead of using programmers power
source you can connect these wires to your own power source, of course the LED
will only start blinking if during the process no errors were found.
But in case if there are
some kind of errors, check the wiring connections between USBASP cable and
microchip first, and always pay attention to what the compiler and cmd states
at the end of the process.
Thank you for your
attention, hopefully you enjoyed this tutorial, there will be more tutorials
coming up soon, so don't forget to visit us again and share our blog with your
friends !
You can Download FULL tutorial file HERE:
You can Download FULL tutorial file HERE:


greensboro electrician At Emergency Electrician Greensboro, we understand how much you rely on electrical energy to power your everyday life. Fortunately, we are experts regarding safeguarding against its inherent risks and are all ready to do the reliable labor had to make sure your home's power systems work for decades to come.
ReplyDeleteI think this is an informative post and it is very useful and knowledgeable. therefore, I would like to thank you for the efforts you have made in writing this article. 15kv capacitor
ReplyDeleteBuy YouTube Comments for the best price. We provide youtube comments in more than 7 languages!
ReplyDeletebuy youtube comments
Buy YouTube Comments for the best price. We provide youtube comments in more than 7 languages!
ReplyDeleteyt comments
Antalya is one of the biggest and most popular cities in Turkey. It is the capital of Antalya Province and has a population of over one million people.
ReplyDeleteantalya summer 2060
The best time to visit Agra is between October and March. This is when the weather is cool and pleasant.
ReplyDeletetourist attractions in agra
The Taipei Zoo is a world-renowned facility that houses more than 2,600 animals from over 200 species. The zoo is located in the heart of Taipei City
ReplyDeleteanimals at the taipei zoo
The best time for visiting Pattaya is between November and February when the weather is cooler and drier.
ReplyDeletethings to do in pattaya
Church Flyer Templates is offering Free PSD Templates Design, Cards, Posters, Banners, Vectors and Backgrounds images for free and Premium. Enjoy this Template Design
ReplyDeletechurch flyer
Our guide, written by experts will cover everything you need to know about planning a trip to Mecca, including how to get there, where to stay, what to see
ReplyDeletewhy visit mecca?
There is no best time to visit Prague. The weather is relatively mild all year round, with temperatures rarely falling below freezing in winter or rising above 32 degrees Celsius in summer.
ReplyDeletewhat to pack for a trip to prague
"Hi there! I just wanted to drop by and say that I really like your work. Your attention to detail and creativity are truly impressive. Keep up the great work and thank you for sharing your talent with the world!"
ReplyDeleteI hope this helps! If you have any further questions, feel free to ask. And thank you for the link to https://apsotech.com/.
Hi, Your blog is very Engaging. Recently I uploaded some content relevent to this blog. Please visit my site Fly Wly; we aim to provide valuable insights and analysis to a broad range of readers, including entrepreneurs, tech enthusiasts, and anyone interested in staying informed about the latest advances in technology and innovation.
ReplyDeleteFor more Information: https://flywly.com/
adıyaman
ReplyDeletesakarya
yalova
tekirdağ
amasya
6GW
Kindness
ReplyDeleteKindness
Kindness
Kindness
Kindness
Kindness
Kindness
Malatya Lojistik
ReplyDeleteAntep Lojistik
Urfa Lojistik
Sivas Lojistik
Erzurum Lojistik
140AH
F354D
ReplyDeleteKeçiören Fayans Ustası
Çerkezköy Asma Tavan
Kocaeli Şehirler Arası Nakliyat
Artvin Parça Eşya Taşıma
Sinop Lojistik
Bitcoin Nasıl Alınır
Aydın Lojistik
Şırnak Lojistik
Trabzon Şehirler Arası Nakliyat
3ACA5
ReplyDeletesteroids for sale
Tekirdağ Boya Ustası
Sivas Evden Eve Nakliyat
halotestin for sale
Düzce Evden Eve Nakliyat
Niğde Evden Eve Nakliyat
Çerkezköy Evden Eve Nakliyat
clenbuterol for sale
parabolan for sale
6B88B
ReplyDeleteurfa canlı sohbet uygulamaları
sinop rastgele sohbet
Ağrı Kadınlarla Ücretsiz Sohbet
Sakarya Yabancı Görüntülü Sohbet Siteleri
isparta en iyi görüntülü sohbet uygulaması
Nevşehir Yabancı Görüntülü Sohbet
bingöl telefonda görüntülü sohbet
Kayseri En İyi Görüntülü Sohbet Uygulamaları
siirt telefonda sohbet
69324
ReplyDeleteSohbet
Binance Para Kazanma
Twitter Retweet Satın Al
Baby Doge Coin Hangi Borsada
Dlive Takipçi Hilesi
Twitter Takipçi Hilesi
Mith Coin Hangi Borsada
Azero Coin Hangi Borsada
Star Atlas Coin Hangi Borsada
64E70
ReplyDeleteLikee App Beğeni Hilesi
Parasız Görüntülü Sohbet
Kripto Para Nasıl Çıkarılır
Ceek Coin Hangi Borsada
Periscope Beğeni Satın Al
Bitcoin Üretme Siteleri
Coin Nasıl Üretilir
Youtube Beğeni Satın Al
Coin Çıkarma Siteleri
At the heart of South Canton Scholars lies a meticulously crafted curriculum that serves as the bedrock of academic advancement. Our curriculum is specifically formulated to promote comprehensive development, utilizing avant-garde teaching methodologies and interdisciplinary modules.
ReplyDeleteEssential oils are concentrated plant extracts that capture the essence, or fragrance, of the plant. They are derived from various parts of plants, including flowers, leaves, stems, and roots. These oils are highly aromatic and are often used in aromatherapy, skincare, and home remedies. Some popular essential oils include lavender, peppermint, tea tree, and eucalyptus, each with its own unique scent and potential health benefits.
ReplyDeleteAI voice generators that can replicate Pokimane's voice. It discusses what makes Pokimane popular and why someone might want to use her AI voice. Two Pokimane AI voice generators are explored in detail: TopMediai Text to Speech and Vidnoz Voice Changer. TopMediai offers a user-friendly interface and supports many languages. Vidnoz allows for more customization of the voice.
ReplyDelete2EB51D1F27
ReplyDeletetiktok takipçi ucuz
Thanks for sharing this useful info.. I also wanna talk about the best custom made adidas tracksuits.
ReplyDeletethank you for a great post.
ReplyDeletecorporate clean standup
Thanks for the nice blog. It was very useful for me. I'm happy I found this blog. Thank you for sharing with us,I too always learn something new from your post. Check our best leather car seat covers.
ReplyDeletethanks this is good blog.
ReplyDeleteJewish wedding music
This is a brilliant blog! I'm very happy with the comments!..
ReplyDeleteSugar ka ilaj
Thank you so much Love your blog..
ReplyDeleteDiabetes ka ilaj
I got what you mean , thanks for posting .Woh I am happy to find this website through google.
ReplyDeleteLaptop repairs Logan
These Android stereos are impressive. The integration of navigation and multimedia functions enhances the driving experience greatly. android car stereo systems
ReplyDeleteNice post mate, keep up the great work, just shared this with my friendz
ReplyDeleteBest wedding band in chicage
Patio railing solutions that combine functionality, weather resistance, and stylish finishes. Add safety and sophistication to your outdoor space with premium patio railing designs. patio railing contractor Patio railing systems designed for easy installation, durability, and long-term outdoor use. Transform your outdoor living area with patio railing ideas that offer both protection and style. Durable patio railing options that provide safety while elevating your home’s exterior design. Discover versatile patio railing designs perfect for modern homes and outdoor living spaces.
ReplyDeleteBuy Refillable Vape Devices Abbotsford for everyday use with easy maintenance and excellent battery life. Explore premium refillable vape devices for a cleaner, more customizable vaping experience. Discover affordable refillable vape devices that provide performance, durability, and convenience. Best refillable vape devices designed for portability, efficiency, and enhanced flavor delivery. Choose refillable vape devices that offer eco-friendly and cost-effective alternatives to disposables. Find the perfect refillable vape device with top-rated performance and user-friendly design. Best refillable vape devices for smooth vapor, customizable settings, and long-term use. Explore high-quality refillable vape devices built for durability, style, and superior performance.
ReplyDeleteDiscover efficient logistics solutions in Langham for smooth and hassle-free cargo delivery. Trusted piano movers saskatoon providing end-to-end freight and transportation services. Best logistics company in Langham for reliable shipping, warehousing, and distribution support. Logistics experts in Langham offering customized solutions for all your transportation needs. Dependable logistics company in Langham ensuring safe and timely delivery of your goods. Affordable logistics services in Langham designed for businesses of all sizes. Logistics company in Langham with advanced systems for tracking, shipping, and delivery efficiency.
ReplyDeleteWhitby Clinic Pharmacy provides affordable medications, consultations, and wellness support. Experience quality care at Whitby Clinic Pharmacy with friendly staff and efficient prescription services. pharmacy consulting services is your go-to destination for prescriptions, health advice, and medical essentials. Stay healthy with Whitby Clinic Pharmacy—professional care, trusted medications, and convenient services. Whitby Clinic Pharmacy offers expert guidance, prescription services, and everyday health solutions. Get the care you need at Whitby Clinic Pharmacy with fast service and trusted healthcare expertise. Whitby Clinic Pharmacy ensures safe, reliable, and efficient pharmacy services for your family.
ReplyDeleteControl sunlight effortlessly with motorized blinds. Ideal for homes and offices seeking comfort and smart automation. window blinds canada Experience smart living with motorized blinds. Easy to operate, stylish, and perfect for modern interiors. Make your home smarter with motorized blinds. Remote control, sleek design, and enhanced privacy in one solution. Simplify your lifestyle with motorized blinds. Automate light control and add a touch of luxury to your home. Motorized blinds bring convenience and style together. Control your windows with ease and improve energy efficiency. Upgrade to motorized blinds for seamless control of light and privacy. Perfect for modern, connected homes. Discover the benefits of motorized blinds—smart control, elegant design, and improved home comfort. Enhance your living space with motorized blinds. A perfect blend of technology, convenience, and style.
ReplyDeleteCreate your dream workspace with home office cabinets in Surrey. Functional, stylish, and built to suit your space. Custom millwork service in Surrey Enhance your home office with cabinets in Surrey. Modern designs with practical storage for efficient workspaces. Get custom home office cabinets in Surrey tailored to your needs. Perfect for maximizing space and organization. Stylish home office cabinets in Surrey for modern homes. Organize your workspace with smart storage solutions. Upgrade your office with home office cabinets Surrey homeowners trust. Quality craftsmanship and modern design. Need storage solutions? Explore home office cabinets in Surrey designed for functionality and sleek aesthetics.
ReplyDeleteRelax in a double room hotel featuring modern design, cozy bedding, and all the essentials for a perfect stay. Book your double room hotel today and enjoy comfort, convenience, and value for money during your stay. Double room hotel options with premium comfort and affordable pricing. Perfect for short trips or long stays. Experience comfort in a double room hotel with spacious layouts, stylish interiors, and top-class amenities. Enjoy a relaxing stay in a double room hotel designed for comfort, privacy, and convenience for two guests. Find affordable double room hotel stays with modern facilities, clean spaces, and welcoming environments. Upgrade your stay with a double room hotel offering comfort, convenience, and excellent service for guests.
ReplyDeleteSimplify shipping with freight forwarding services. End-to-end logistics solutions for businesses of all sizes. supply chain advice Quebec Global freight forwarding services offering reliable transport, customs clearance, and efficient supply chain management. Choose trusted freight forwarding services for secure cargo handling and timely international deliveries. Freight forwarding services designed for efficiency. Reduce costs and improve delivery speed with expert logistics support. Professional freight forwarding services for smooth international trade. Safe, fast, and reliable cargo management. Streamline your logistics with freight forwarding services. Expert solutions for global shipping and supply chain needs. Affordable freight forwarding services for businesses. Ensure safe, timely delivery of goods worldwide. Freight forwarding services that deliver results. Efficient transport, expert handling, and reliable global networks.
ReplyDeleteGet professional BPO services in Vancouver. Streamline operations with cost-effective and scalable outsourcing solutions. bpo services in abbotsford Best BPO services Vancouver companies rely on. Expert solutions for customer service, back-office, and IT support. Discover trusted BPO services in Vancouver. Enhance efficiency with customized outsourcing strategies for your business. Searching for the best BPO services Vancouver? Get expert support for call centers, admin tasks, and data management. Reliable BPO services in Vancouver for seamless business operations. Improve productivity with expert outsourcing solutions. Best BPO services Vancouver providers offering flexible and efficient outsourcing for businesses of all sizes. Optimize your workflow with Vancouver’s best BPO services. Reduce costs and improve service quality effortlessly. High-quality BPO services in Vancouver for customer support and back-office operations. Scale your business faster.
ReplyDeleteProtect your investment with roof maintenance services in Edmonton. Regular upkeep for better performance and safety. Roof Maintenance services in Morinville Affordable roof maintenance services in Edmonton. Extend your roof’s lifespan with expert solutions and inspections. Need roof maintenance in Edmonton? Get professional services for leak prevention, repairs, and routine inspections. Edmonton roof maintenance experts offering reliable inspections and upkeep for long-term roof performance. Ensure your roof stays in great shape with Edmonton roof maintenance services. Prevent issues before they start. Quality roof maintenance services in Edmonton for all roof types. Keep your property safe and secure year-round. Edmonton roof maintenance services designed to improve durability and prevent costly repairs. Book today.
ReplyDelete